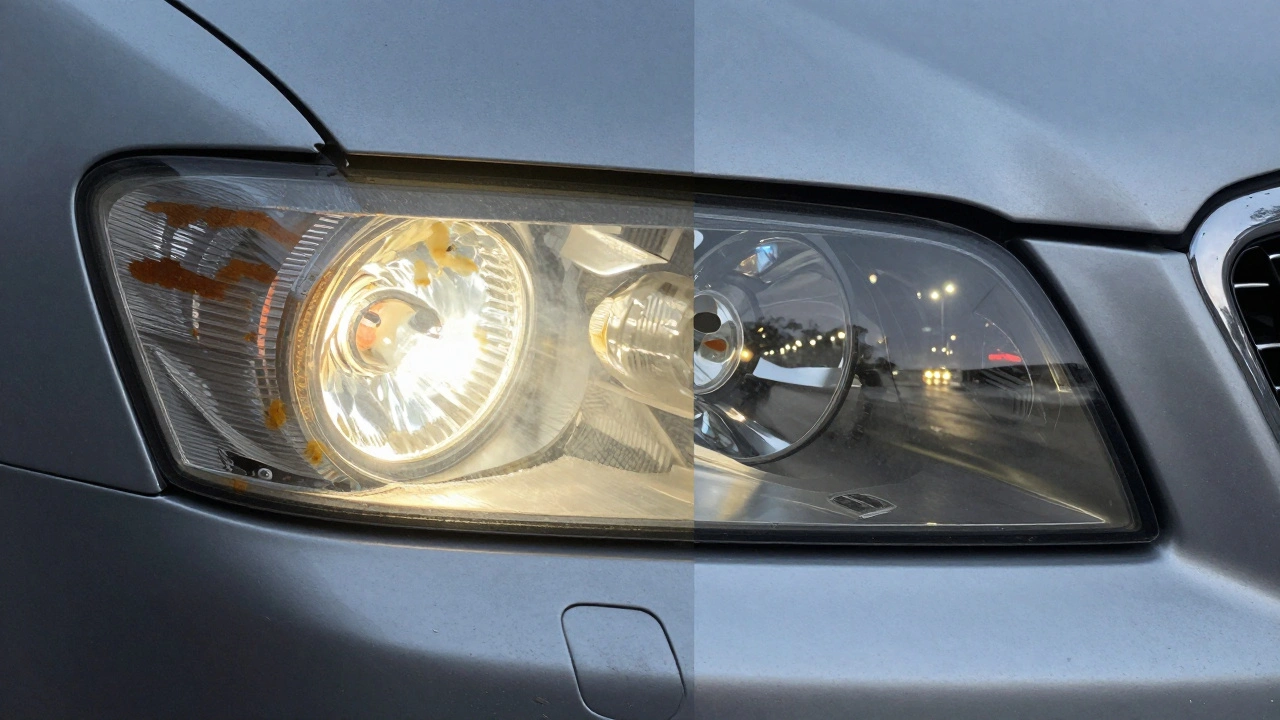
Why Do Headlights Get Foggy?
Your headlights aren't actually made of glass; they are made of a hard plastic called polycarbonate. To stop the sun from melting or yellowing this plastic, manufacturers apply a thin UV-resistant coating. Over several years, this coating breaks down due to constant exposure to sunlight, road salt, and heat. Once that shield is gone, the plastic itself begins to oxidize. This is why you see that characteristic yellow haze. It isn't just dirt on the surface-it's a chemical change in the plastic. While road grime and dead insects make it look worse, the real culprit is UV damage. If you don't fix it, your lights won't just look old; they will actually push less light onto the road, making nighttime driving dangerous.Quick Summary: Restoration Options
- DIY Toothpaste Method: Good for very mild hazing; temporary fix.
- Chemical Kits (e.g., Philips): High efficiency, includes UV protection, takes about 30 minutes.
- Sanding & Polishing: Best for severe oxidation; requires a multi-step process with varying grit sandpaper.
- Professional Services: Highest quality finish and longest-lasting seal.
The Three-Step Professional Process
If you want a result that lasts more than a few weeks, you need to follow a structured process. Professional shops and high-end kits usually follow this logic:- Surface Cleaning: You start by removing the surface build-up. This means scrubbing away the road grime, bugs, and loose debris. A polishing compound is often used here to clear the way for the actual restoration.
- Removing Oxidation: This is the core of the job. If the haze is deep, you use fine-grit sandpaper or a deoxidizer to physically strip away the yellowed plastic. You're essentially sanding the lens down to a fresh, clear layer of polycarbonate.
- Applying UV Protection: This is the step most people skip, and it's why their headlights get foggy again after a month. You must apply a UV Sealant or clear coat. This acts as the new "skin" for the headlight, protecting it from the sun's rays.
Comparing Popular Restoration Methods
Not all methods are created equal. Depending on whether you have a light haze or a deep yellow crust, your choice of tools will change.| Method | Effort Level | Durability | Best For... |
|---|---|---|---|
| Toothpaste / Rubbing Alcohol | Low | Very Low | Light cleaning/surface grime |
| Magic Eraser | Low | Low | Surface oxidation (risk of scratches) |
| Philips Restoration Kit | Medium | High | Most DIY users wanting a professional look |
| Full Sanding & Clear Coat | High | Very High | Severe yellowing and deep pitting |
DIY Tips: What Actually Works?
You've probably seen "hacks" on social media promising a one-minute fix. Be careful. Many of those tricks just move the oxidation around or use chemicals that strip the plastic further without adding protection. If you're tackling this at home, start by assessing the damage. Use your fingernail to feel the lens. If it feels rough or "crusty," you'll need a kit with sandpaper. If it's just a light cloudiness, a polishing compound might do the trick. For a quick cleanup of road debris and dead bugs, some find that spraying WD-40 and letting it sit for 10-15 minutes before rinsing helps loosen the grime. However, keep in mind that WD-40 is not a permanent restoration solution; it's a lubricant and cleaner, not a UV protectant. If you try the toothpaste trick-applying it with a microfiber cloth in circular motions-don't expect it to last. Toothpaste is a very mild abrasive. It might make the lens look clear for a few car washes, but without a UV sealant, the yellowing will return almost immediately because the underlying problem (the missing protective layer) hasn't been solved.Avoiding Common Pitfalls
One of the biggest mistakes people make is using a Magic Eraser too aggressively. While it's great for removing surface oxidation, it's basically a very fine sponge of melamine foam. If you press too hard, you can leave micro-scratches in the plastic that actually make the headlights look blurrier over time. Another common error is skipping the masking process. Before you start sanding or spraying a clear coat, use painter's tape to cover the paint surrounding the headlight. If you don't, you'll end up sanding your clear coat or getting droplets of sealant on your fenders, which is a much bigger mess to clean up than foggy lights.How to Keep Your Headlights Clear Longer
Once you've spent the time and effort to restore your lenses, you want them to stay that way. The key is preventative maintenance. Don't wait for the haze to return to take action. First, keep them clean. Road salt and grime act like sandpaper on your lenses. A gentle wash every week prevents debris from etching into the plastic. Second, if you notice a slight dullness returning after a year, you can apply a fresh layer of UV sealant. This "top-up" approach is much easier than doing a full restoration every two years. Finally, if you park your car daily in direct sunlight, consider a car cover or parking in a garage. The less UV radiation the polycarbonate absorbs, the longer your restoration will last. It's a simple trade-off: a little bit of protection today saves you hours of sanding tomorrow.Will rubbing alcohol fix my cloudy headlights?
Rubbing alcohol is great for removing surface grease, oils, and grime, but it cannot fix oxidation. Because the cloudiness is caused by the plastic itself breaking down, alcohol only provides a very temporary improvement in clarity. It doesn't address the UV damage or provide any long-term protection.
How long does a professional headlight restoration last?
If done correctly with a high-quality UV-protective sealant, a restoration can last anywhere from 2 to 5 years. The longevity depends entirely on the quality of the sealant used and how much sun exposure the vehicle gets. Without a sealant, the headlights often begin to fog again within a few months.
Is it better to restore or replace the headlights?
Restoration is significantly more cost-effective. Replacing a pair of headlight assemblies can cost hundreds of dollars in parts and labor. Restoration usually costs a fraction of that and achieves similar light transmission, provided the plastic isn't cracked or internally damaged.
Can I use a regular clear coat spray from a hardware store?
It's not recommended. Standard clear coats often lack the specific UV inhibitors needed for polycarbonate plastic. Some hardware store sprays can even react poorly with the plastic or peel off quickly. It's best to use a dedicated headlight sealant specifically formulated for automotive lenses.
How do I know if my headlights are too far gone to restore?
If the plastic has deep cracks (crazing) or if the cloudiness is on the *inside* of the lens (caused by moisture/condensation leaks), restoration won't work. Restoration only fixes the exterior surface. If the seal of the headlight assembly is broken and water is getting in, you'll likely need to replace the unit.
Next Steps for Different Drivers
- The Budget DIYer: Start with a microfiber cloth and a mild polishing compound. If that doesn't work, move up to a basic restoration kit.
- The Perfectionist: Go for a multi-stage sanding process (starting with 800 grit and moving to 3000 grit) followed by a professional-grade UV clear coat.
- The Time-Crunched Owner: Use a fast-acting commercial kit like the Philips one, which is designed to get the job done in about 30 minutes.