Every pet owner knows the feeling: you pull into the driveway, open the back door, and there it is - a jagged tear in the passenger seat, or a cluster of claw marks across the fabric. It’s not just unsightly; it’s a slow leak in your wallet. Professional upholstery repair can cost hundreds, but the good news? Most pet damage on car seats and panels can be fixed yourself - for under $20.
Understanding the Damage
Pet damage isn’t one-size-fits-all. It shows up in three main forms: surface scratches, small tears, and deep rips or cracked vinyl. Cloth seats usually get scratched or torn by claws. Leather and vinyl seats suffer from cracking, peeling, or holes from chewing or sharp nails. The severity determines your fix. A few light scratches? A simple kit does the job. A hole the size of your thumb? You’ll need patches or filler. Complete panel separation? That’s a pro job.Repairing Cloth Car Seats
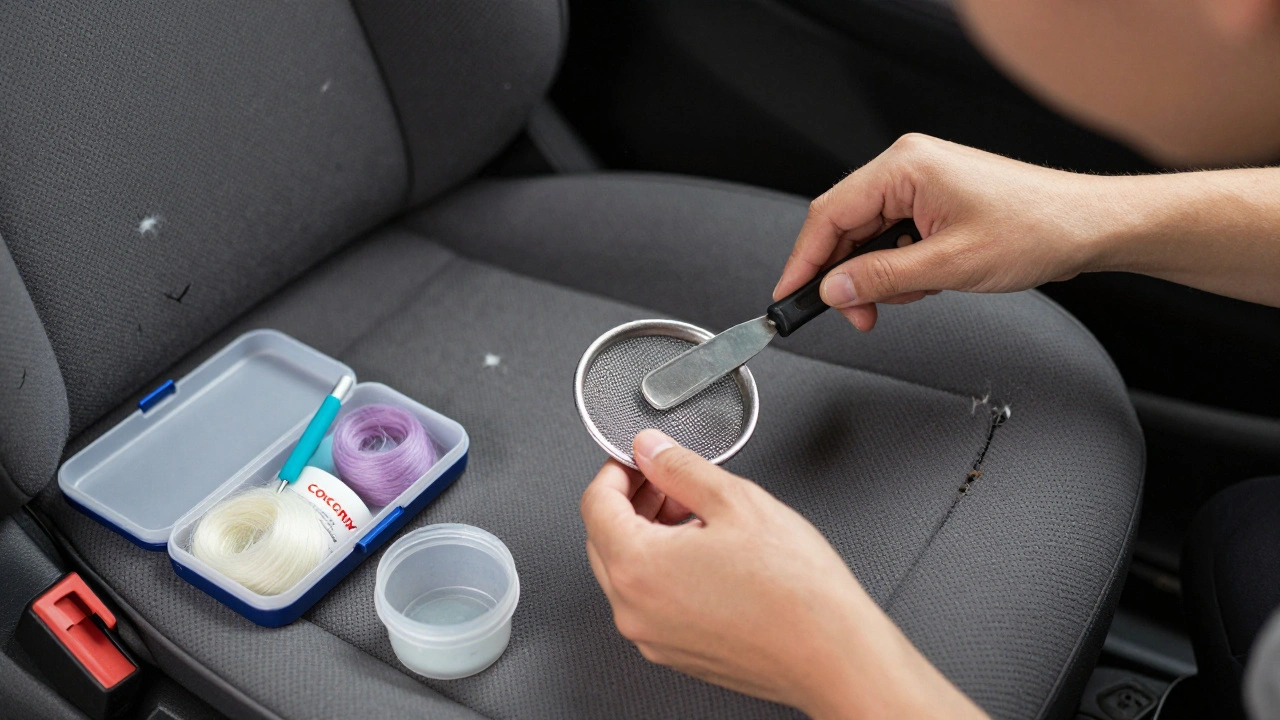
For fabric seats, the Coconix Fabric and Carpet Repair Kit is the go-to solution. It’s designed for pet damage and includes everything you need: color-matching fibers, fabric glue, backing material, a mixing jar, a spatula, and mesh strainers. Here’s how it works:- Clean the area. Use a mild cleaner and a soft cloth. Remove any loose threads or frayed edges - don’t tug, just snip.
- Prepare the base. For tears larger than 1/4 inch, cut a piece of backing fabric slightly bigger than the hole. Round the edges so they don’t lift. Slide it under the tear using the spatula. Smaller scratches? Skip this step.
- Match the color. Use the included Color Mixing Guide. Pour fibers into the jar with the metal ball, shake hard until the color looks right. Test it on a hidden spot first. If it’s too dark, add more fibers. Too light? Mix in a little more.
- Apply glue. Dab a thin layer of fabric glue along the edges of the tear, working inward. Avoid globs. You want just enough to hold fibers, not flood the fabric.
- Sprinkle fibers. Stretch a mesh over the jar opening with a rubber band. Turn the jar upside down over the glued area and tap gently. Let fibers fall like snow. Cover the whole damaged zone.
- Press and set. Use the spatula to gently press fibers into the glue. If your seat has a pattern, try to mimic it. Let it dry for at least 24 hours. No rushing.
- Finish up. After drying, vacuum or brush off loose fibers. That’s it. The repair blends in. You won’t even notice it unless you’re looking for it.
Repairing Leather and Vinyl Seats
Leather and vinyl need different tactics. You can’t just sprinkle fibers - you need to rebuild the surface. Here are three proven methods:Method 1: Leather Repair Kit
A standard leather repair kit includes adhesive, filler, and colorant. Follow these steps:- Slide a small piece of backed cloth behind the tear. This gives the repair structure.
- Apply leather adhesive to the cloth and press it into place.
- Pack leather filler over the cloth until it’s level with the surrounding seat. Smooth it out with a damp cloth.
- Once dry, apply colorant in thin layers. Let each layer dry. Build up slowly until it matches the original shade.
Method 2: Leather Patches
For bigger rips or holes, patches work better than filler. Use a wax paper-backed patch:- Trim the patch so it covers the entire damaged area with a little overlap.
- Slide a sheet of wax paper behind the tear. This keeps glue from sticking to the seat foam.
- Apply adhesive to the patch edges - not the center.
- Press the patch down over the tear and wax paper.
- Let it cure for 24 hours. No sitting on it.
Method 3: Fluid Leather
If your leather is dry and cracked but not torn, fluid leather is a quick fix. Mix it with water at a 70:30 ratio. Use a sponge to coat the whole seat. Then, apply a final coat of undiluted fluid leather over cracks and scuffs. It fills in the gaps and revives the surface. It won’t fix holes, but it makes old leather look new again.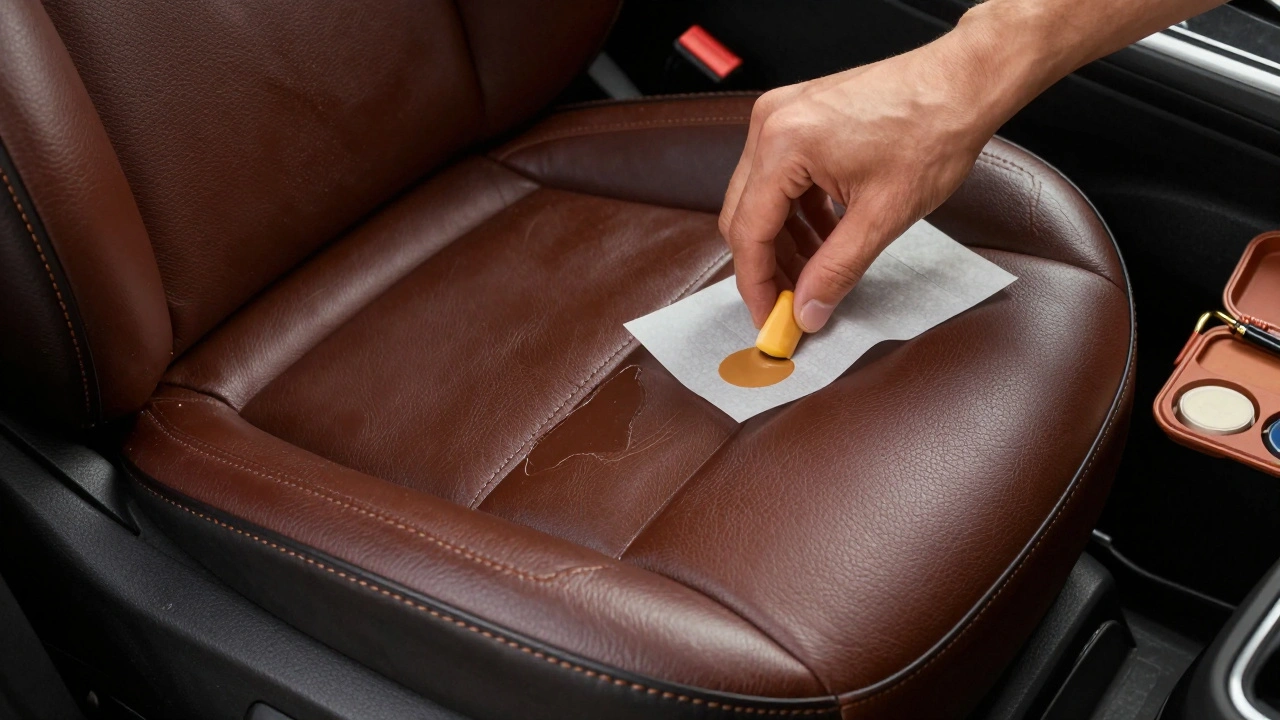
When to Call a Pro
Some damage isn’t DIY-friendly. If the vinyl is completely separated from the foam backing, or the seat frame is exposed, you’re looking at panel replacement. This means removing the entire seat cover, cutting out the damaged section, steaming the fabric flat, stitching in a new panel, and reinstalling everything. It takes hours, special tools, and knowledge most people don’t have. Unless you’re into upholstery work as a hobby, this is a job for a professional. Expect to pay $300-$800 depending on the car model.Cost Comparison: DIY vs. Professional
A Coconix kit costs $18. A leather repair kit runs $25. Both fix most pet damage. Professional upholstery repair? Minimum $250, often $500+ for a single seat. Even if you mess up the DIY fix, you’ve spent less than a quarter of what a shop would charge. And if it works? You saved 90%.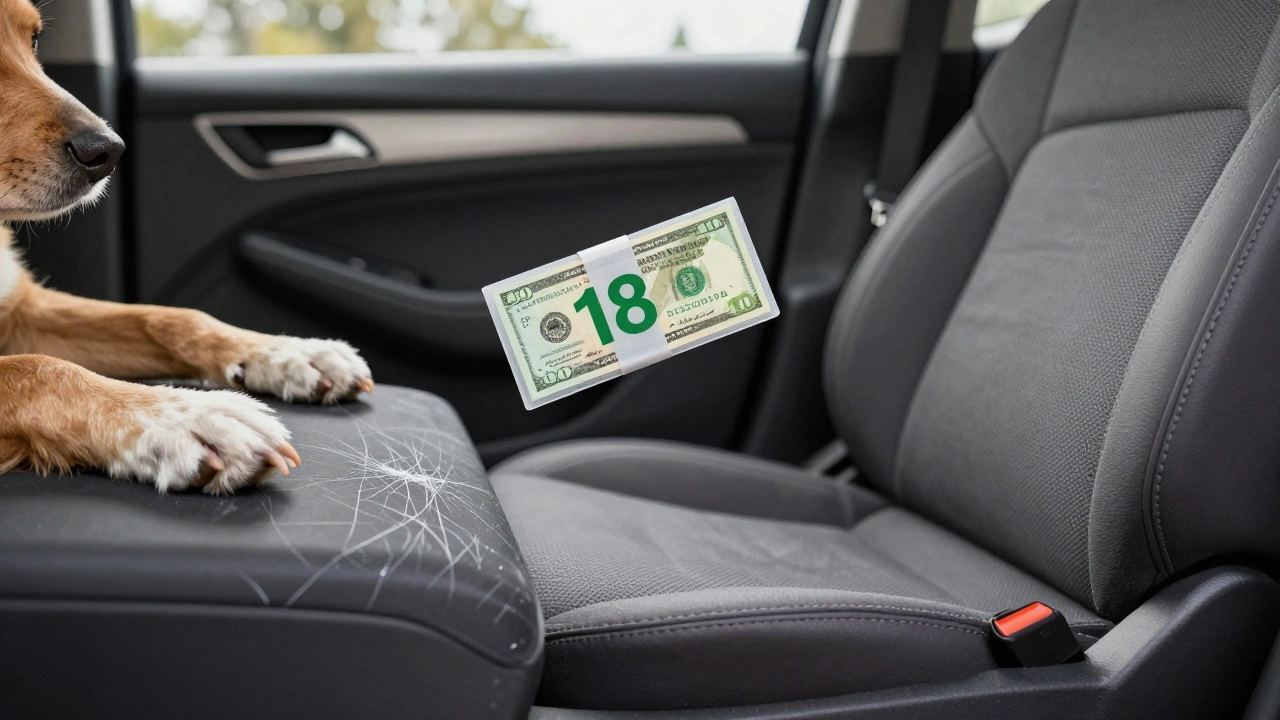
Preventing Future Damage
Fixing is one thing. Stopping it from happening again? That’s smarter.- Use seat covers. Heavy-duty, non-slip ones with pet-friendly fabric. They’re cheap and washable.
- Trim your pet’s nails every 2-3 weeks. It’s that simple.
- Keep sharp objects off the seats. Leashes, collars, and toys can snag fabric.
- Apply a fabric protector or leather conditioner every 3 months. It creates a barrier against claws and spills.
- Never leave your pet in the car on hot days. Sun + heat = cracked leather. It’s not just uncomfortable - it’s irreversible.
What to Avoid
Don’t make these mistakes:- Don’t use super glue on fabric. It hardens and cracks.
- Don’t scrub with stiff brushes. You’ll damage the fibers.
- Don’t use bleach or ammonia-based cleaners. They eat away at dyes and stitching.
- Don’t rush drying. Glue and filler need time. If you sit on it too soon, you’ll ruin the repair.
Final Thoughts
Pet damage on car seats doesn’t have to mean a new car or a big repair bill. Most scratches, tears, and even small holes can be fixed with tools you can buy online. The key is matching the repair method to the damage type. Cloth? Use the fiber kit. Leather? Go with filler or patches. Severe structural damage? Call a pro. And always, always - prevent future damage before it starts. A little care now saves you hundreds later.Can I fix pet scratches on my car seat myself?
Yes, for most scratches and small tears. DIY kits like Coconix are designed specifically for pet damage and cost under $20. They work on cloth seats by filling in fibers and matching colors. Leather damage requires different products, but even those are affordable and easy to use with step-by-step guides.
What’s the cheapest way to repair a torn car seat?
The cheapest way is using a fabric repair kit for cloth seats ($15-$20) or a leather patch with adhesive ($25). Both avoid professional labor costs, which start at $250. For minor damage, DIY is always cheaper.
Will a DIY repair last as long as a professional one?
For scratches and small tears, yes - if done correctly. A properly applied fabric repair can last years with light use. Leather filler repairs hold up well if the surface is maintained with conditioner. The main difference is durability under heavy use. A pro repair uses industrial tools and materials, but for most pet owners, DIY is more than enough.
Can I repair vinyl seats the same way as leather?
Similar, but not identical. Vinyl is less porous than leather, so it doesn’t absorb filler as well. Use a flexible vinyl repair kit with a strong adhesive. Heat-activated patches work best for holes. Always test on a hidden area first. Fluid leather won’t stick well to vinyl - use a product labeled for vinyl or PVC.
How do I match the color of my car seat?
Most kits include a color mixing guide with sample swatches. Start with the closest match, then mix in tiny amounts of darker or lighter fibers. Shake the jar hard. Test on a hidden area like under the seat. Let it dry completely before judging - wet color looks darker. It’s trial and error, but with practice, you’ll get it right.
Do I need special tools for these repairs?
Not really. Most kits include everything: spatula, mixing jar, mesh strainer, glue, fibers. For leather patches, you’ll need scissors, a damp cloth, and maybe a hair dryer to help the adhesive set. No sewing machine, no heat gun, no special training. Everything you need fits in a shoebox.
How long does a DIY pet damage repair take?
The actual work takes 30-60 minutes. But drying time is critical. Fabric repairs need 24 hours. Leather filler needs 4-8 hours to set, then another 24 before heavy use. Plan for at least one full day of no sitting on the seat. Rushing = failed repair.
Can I use household glue or super glue to fix my car seat?
No. Household glue becomes brittle, yellows over time, and doesn’t bond with fabric or leather properly. It can also stain or harden the material. Always use a repair-specific adhesive designed for upholstery. It stays flexible and lasts longer.